DEATH IS INFINITE: Giant Squadt project finished!
Page 5 of 8 •  1, 2, 3, 4, 5, 6, 7, 8
 ![]()
Re: DEATH IS INFINITE: Giant Squadt project finished!
![]() fplus Sat Jul 21, 2012 6:33 am
fplus Sat Jul 21, 2012 6:33 am
JasperF wrote:How do you make the weapons? Trying to sculpt but the keep falling apart haha
I'll be doing an update specifically about that soon!
Ok, update time,
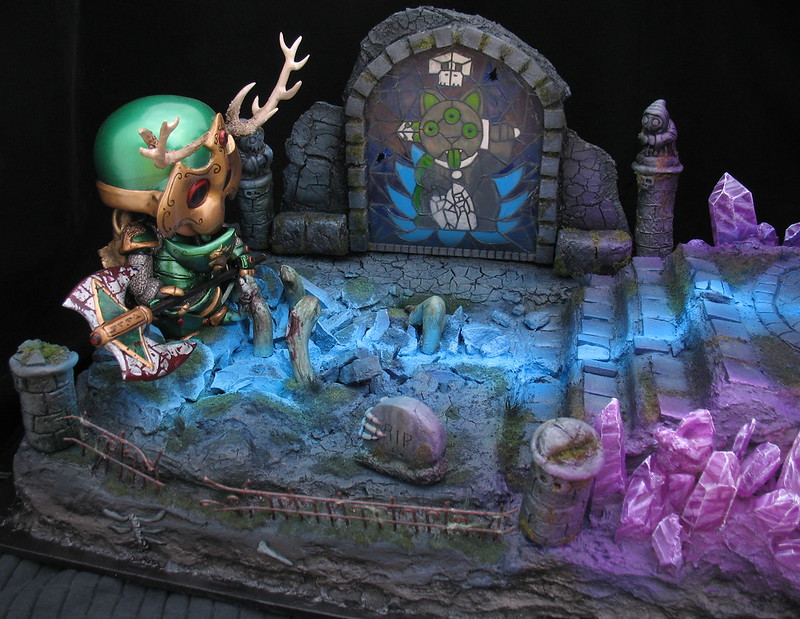
The base is coming along nicely, and with most elements completed or at least roughed out, things are really starting to take shape!
painting the quartz, because as cool as it looks, I wanted to make it the main element of glowing to help set up the right side of the piece, so I give it a nice initial spray of transparent flouro purple:

then, I go through and hand paint each one with a darker purple, a pink, and then finallly a very fine touch of pure white to help sell the highlights and make them feel a bit more dynamic, and properly crystal-y!

then, it was onto the stained glass, which was interesting, because while I was making it, I realized, I had never done stained glass before. lol
first attempt, was a bit too complicated and too distracting, and the first idea I had for paints turned out to be very blotchy, opaque and troublesome.

so after some testing on another piece of plexi, I decided to break it down and re-do it, with a slightly different design to cater to a better color palette. Here it is, just the "leading"painted in. It's basically a puff paint that has a matte finish, normally people just squirt it right from the bottle in a line, but given the size of the lines I wanted, I ended up hand brushing it on, which was kind of annoying as it sets up pretty quick.
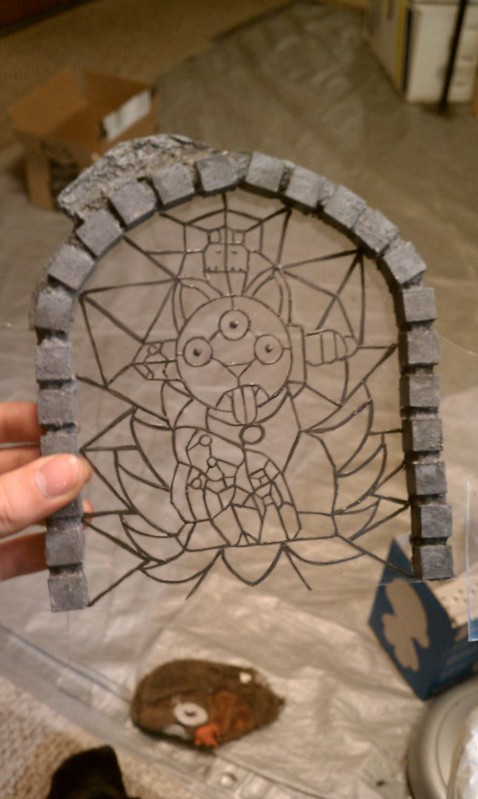
For the second attempt, I decided to do masking, and spray transparent paints to get a more uniform effect while preserving translucency. Here, you can see the piece masked off in sections,each time cutting out all the areas that get that color, then carefully sticking it back on after drying, and cutting out the areas for the next color.

as you can see, the colors fit the scene much better I think.

I then distressed the glass, added some cobwebs, and broke out a couple panes and cracked some others to help the window fit the scene a bit better.

Lit from behind:

In other news, the Demon angel is coming along nicely, and is almost complete. still a little bit of finishing to do. The contrast in the glow is so strong, that it kind of screws with the camera and makes it look even more extreme than it really is.


And his weapon, the staff of the Ouroboros (fun thing to read about here: http://en.wikipedia.org/wiki/Ouroboros)
initial sculpt:

painted up in gold liquid leaf:

Ok, that's it for now! Next update will be weapons, and then I'll hold out for final shots me thinks!
Last edited by fplus on Sat Jul 21, 2012 8:11 am; edited 1 time in total

fplus- CAD Recruit
- Posts : 99
Join date : 2011-09-23 -

Re: DEATH IS INFINITE: Giant Squadt project finished!
![]() ilovefreestufftoo Sat Jul 21, 2012 6:45 am
ilovefreestufftoo Sat Jul 21, 2012 6:45 am


ilovefreestufftoo- c0113c70r_D3$7r0y3r
- Posts : 4268
Join date : 2012-05-13
Location : So Calif
Re: DEATH IS INFINITE: Giant Squadt project finished!
![]() chase1319 Sat Jul 21, 2012 6:47 am
chase1319 Sat Jul 21, 2012 6:47 am


chase1319- CAD Too Buku
- Posts : 1413
Join date : 2011-08-29
Age : 40
Location : San Diego, CA -
Re: DEATH IS INFINITE: Giant Squadt project finished!
![]() devito1195 Sat Jul 21, 2012 6:54 am
devito1195 Sat Jul 21, 2012 6:54 am

devito1195- CAD Too Buku
- Posts : 859
Join date : 2011-04-03
Age : 44
Location : New Jersey


Admin- FERG
- Posts : 3993
Join date : 2008-06-21 -

dddaaa- CAD Grunt
- Posts : 117
Join date : 2011-10-07
Re: DEATH IS INFINITE: Giant Squadt project finished!
![]() manny Sat Jul 21, 2012 9:45 am
manny Sat Jul 21, 2012 9:45 am

manny- CAD Too Buku
- Posts : 1026
Join date : 2010-06-14
Re: DEATH IS INFINITE: Giant Squadt project finished!
![]() Ballou34 Sat Jul 21, 2012 12:28 pm
Ballou34 Sat Jul 21, 2012 12:28 pm
The result is awesome. I can't wait to see it in person.
Thanks F+ for what you have done.

Ballou34- CAD Grunt
- Posts : 256
Join date : 2011-06-05
Age : 36
Location : France -
Re: DEATH IS INFINITE: Giant Squadt project finished!
![]() JasperF Sat Jul 21, 2012 8:06 pm
JasperF Sat Jul 21, 2012 8:06 pm

JasperF- CAD Too Buku
- Posts : 1002
Join date : 2012-05-16
Age : 38
Location : Utrecht, the Netherlands
Re: DEATH IS INFINITE: Giant Squadt project finished!
![]() redwood510 Sun Jul 22, 2012 9:19 pm
redwood510 Sun Jul 22, 2012 9:19 pm

redwood510- CAD Special Forces
- Posts : 520
Join date : 2012-06-12
Age : 40
Location : The Bay
Re: DEATH IS INFINITE: Giant Squadt project finished!
![]() fplus Tue Jul 31, 2012 10:32 pm
fplus Tue Jul 31, 2012 10:32 pm
until then, as promised, here's how I do weapons, this is probably not the easiest or least labor intensive way, but I find I get the best results this way.
I usually start with a wooden dowl for the handle, something thin enough that it can slide in and out of the hand with minimal paint scratching, but not so thin that it will just fall out. I then cut a template of the blade in plasticard something to reinforce the shape when I go to make the blade in resin.

I then lay over a fairly rough layer of magic sculpt on both sides, trying my best to avoid dips in the surface, as the goal is to make the side of the blade completely flat. the edges, I care a little less about, because I know I'm going to do a ton of sanding here.

using a sanding table, I rough out the shape as evenly as I can, and then dremel down the spots the table cant get to. this gives me a pretty solid and uniform blade-like edge, and also you can see the areas where the resin ended up a little thinner than the rest

Often times, this will be the point I smooth on some more magic sculpt into these lower areas, then re -sand, and go over the whole thing with 180, then 300 grit sand paper. you can see the lighter area of newly added resin on this guy:
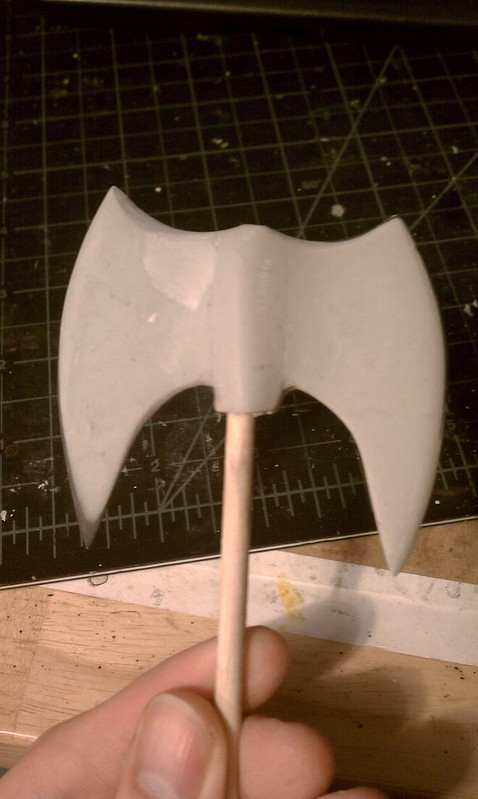
I'm not the most anal person in the world, as I like my pieces to still have an organic and hand made feel to them, at this point, I feel good enough about the shape to spray it with some grey primer, and go over the primer with a finishing sponge:

You'll see I glued on some plasticard panels, and then worked some magic sculpt around the trim. I then spray the blade with a metallic spray paint. As a spray on chrome effect is near impossible (or very expensive) I tend to settle for a beaten metal look, as it fits the fantasy style well. Some times, I'll do metal leaf or liquid leaf for this effect as well.

Using a very fine monogram bit on my dremel, I engraved the norse letter for STAG into the axe head. I then go over the areas with a gold liquid leaf, which is terrible stuff with a terrible scent, definitely use a organic vapor respirator with it, or I'm pretty sure you'll kill some brain cells. and follw that with some of the green metallic I used on the Stag, mixed with some black ink, to give a nice pearly/marbled effect.

Kind of a crappy final pic, but here's the blade all painted up. I use thin coats of black and whit acrylic mixed with glazing liquid and silver mica flake (most silver acrylics should work) (to keep it pretty sparkly in person)to give it a bit more stylized effect , and a little faux lighting. I always go darker on the edge of the blade, to help show the bevel. Then the whole thing gets a couple thin coats of acrylic high gloss varnish:

Hope that helps some of you guys! feel free to ask me any questions!
fplus- CAD Recruit
- Posts : 99
Join date : 2011-09-23 -
Re: DEATH IS INFINITE: Giant Squadt project finished!
![]() itsa_mia Tue Jul 31, 2012 11:20 pm
itsa_mia Tue Jul 31, 2012 11:20 pm
how much do squadts generally weigh after your done?

itsa_mia- c0113c70r_D3$7r0y3r
- Posts : 5336
Join date : 2011-10-26
Age : 55
Location : N49 -
Re: DEATH IS INFINITE: Giant Squadt project finished!
![]() fplus Tue Jul 31, 2012 11:22 pm
fplus Tue Jul 31, 2012 11:22 pm
itsa_mia wrote:thats magic, +101 awesome +250 kick ass
how much do squadts generally weigh after your done?
Thanks man!
They're usually still under a pound when they're done. Unless I do wings, ironically, those things get heavy.
fplus- CAD Recruit
- Posts : 99
Join date : 2011-09-23 -
Re: DEATH IS INFINITE: Giant Squadt project finished!
![]() itsa_mia Tue Jul 31, 2012 11:28 pm
itsa_mia Tue Jul 31, 2012 11:28 pm
they look so heavy
looking forward to the final photos!
itsa_mia- c0113c70r_D3$7r0y3r
- Posts : 5336
Join date : 2011-10-26
Age : 55
Location : N49 -
Re: DEATH IS INFINITE: Giant Squadt project finished!
![]() fplus Tue Jul 31, 2012 11:34 pm
fplus Tue Jul 31, 2012 11:34 pm
itsa_mia wrote:wow, still light
they look so heavy
looking forward to the final photos!
yeah, I mean, it's definitely noticeably heavier then the raw vinyl for sure.
fplus- CAD Recruit
- Posts : 99
Join date : 2011-09-23 -
Re: DEATH IS INFINITE: Giant Squadt project finished!
![]() JasperF Wed Aug 01, 2012 12:39 pm
JasperF Wed Aug 01, 2012 12:39 pm
JasperF- CAD Too Buku
- Posts : 1002
Join date : 2012-05-16
Age : 38
Location : Utrecht, the Netherlands
Re: DEATH IS INFINITE: Giant Squadt project finished!
![]() jorester Wed Aug 01, 2012 5:32 pm
jorester Wed Aug 01, 2012 5:32 pm
F-plus
jorester- Quickly the Exits!
- Posts : 4138
Join date : 2008-11-06
Age : 52
Location : france
Re: DEATH IS INFINITE: Giant Squadt project finished!
![]() Buellster Wed Aug 01, 2012 6:42 pm
Buellster Wed Aug 01, 2012 6:42 pm

Buellster- CAD Special Forces
- Posts : 649
Join date : 2008-07-08
Location : The Good O'L US of England
Re: DEATH IS INFINITE: Giant Squadt project finished!
![]() fplus Wed Aug 01, 2012 9:26 pm
fplus Wed Aug 01, 2012 9:26 pm
JasperF wrote:Once again a great update, am looking forward to seeing the end result. Also thank you VERY much for this update, perhaps I will start a new weapon sculpting tonight! I do have a question though, if you talk about resin do you mean like the clay that hardens out or do you use a mold and two parts resin? Sorry if I'm asking too much details but this is all very new to me
I can see how that can be confusing. In this case, resin = magic sculpt.
fplus- CAD Recruit
- Posts : 99
Join date : 2011-09-23 -
Re: DEATH IS INFINITE: Giant Squadt project finished!
![]() LonerStoner Thu Aug 02, 2012 7:04 am
LonerStoner Thu Aug 02, 2012 7:04 am

LonerStoner- c0113c70r_D3$7r0y3r
- Posts : 4746
Join date : 2009-08-13
Location : the party bowl
Re: DEATH IS INFINITE: Giant Squadt project finished!
![]() yanyaniscool Fri Aug 03, 2012 1:07 am
yanyaniscool Fri Aug 03, 2012 1:07 am

yanyaniscool- CAD Special Forces
- Posts : 725
Join date : 2012-02-10

cheapass- CAD Too Buku
- Posts : 1074
Join date : 2009-06-26
Location : SoCal
Re: DEATH IS INFINITE: Giant Squadt project finished!
![]() fplus Sat Aug 11, 2012 4:37 am
fplus Sat Aug 11, 2012 4:37 am
As he ventures deep into the harsh and inhospitable nether regions of the outlying area simply known as "The Wastes", he knows he can not go back now, not when he has come so far. The Ghouls and horrors he has seen along the way would have broken most men, but not the knight they have grown to affectionately call "The Stag" (from his name sake, Sir Taenius of the Alussion Gardens). As he struggles to gain purchase up the slippery cliffside, he realizes the toll the trip has taken on him. It would be so easy to let himself go and slide like a forgotten doll, back down the jagged slope into the unforgiving darkness. From the faint, yet savage sounds below, there is no doubt of monsters laying in wait in that impossibly black pit. All manner of creature poised with anxious ferocity, for his inevitable misstep. He pictures the face of his beloved. Her night sky hair, like gently spun onyx. Her eyes, deep as the great oceans, and as hypnotic as the waves on their shores. Her stunning beauty, quickly replaced by the twisted face of her certain terror. It burns our hero in his chest, like he just swallowed a fistful of white hot coal.
With freshly stoked determination, he pulled his heavily armored body over the summit, standing to find the lost Cemetery of the Ghonne. The graveyard that lay in front of him was chillingly desolate and bereft of even the whispers of wind. The Ghonne, a cult of dark alchemists that serve their Demon masters beyond the veil of mortality, had a reputation for blood rituals. in their last days, they had kidnapped and killed every member of a small neighboring village, resulting in an all out attack by the Queen's guard, where every member of the cult was slain without quarter, and their entire village was turned into a graveyard, the ground salted, and every building set aflame.
It was rumored that this place was haunted by the vengeful spirits of those Dark artisans, but the Stag knew the truth of it. It was no rumor, he had seen that Nightmarish angel with his own eyes, with skin that must have been made of blue flames, the alchemical symbols on his robe unmistakable to his scholarly eyes. The monster that took his love was some how related to the Ghonne, and this God forsaken place was undoubtedly where it had taken her. As he wandered deeper into the seemingly endless dead lands, the silence was broken, by the unearthly sound he had first heard a few days prior. As the sound grew, so did a faint purple glow in the distant fog. With a slight reluctance, the stag pressed forward, now seeing a familiar blue color framed by the purple glow. as the mist parted, and the vague features came into focus, he stood, more than slightly stunned at the realization, that odd, faint sound was of flesh burning with the blue flame of a Demon.
Fear struck him like a ram charging headfirst into an anvil. The Demon was looking right at him--no, right at his very soul. As he raised his blood soaked battle axe for combat, the Demon's mouth opened to make a cacophony of sound. It was like a thousand guttural voices screaming in pain all at once, yet somehow he understood the message with crystal clarity: "Death is infinite". Just then, the ground began to tremble and split with the same haunting blue light erupting from below. As the land beneath shifted, arms started to burst forth violently from the blighted ground, as the restless corpses of the Ghonne cultists started to frantically grasp at his cape and armor.
The Stag stood frozen, absolutely shocked as the dark world in front of him transformed into an absolute masterpiece of certain death. This time, he did not think of giving up, but of something his father told him "Bravery is not about being fearless in the face of danger; bravery is when you are filled to the brim with fear, and you fight with everything you have despite it."


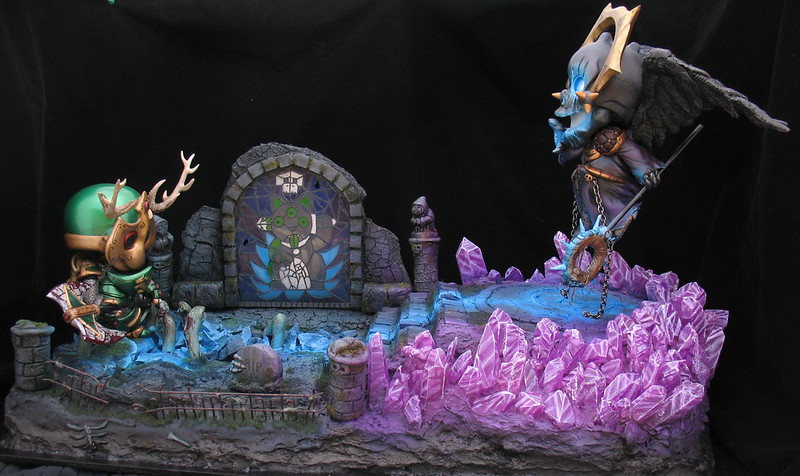


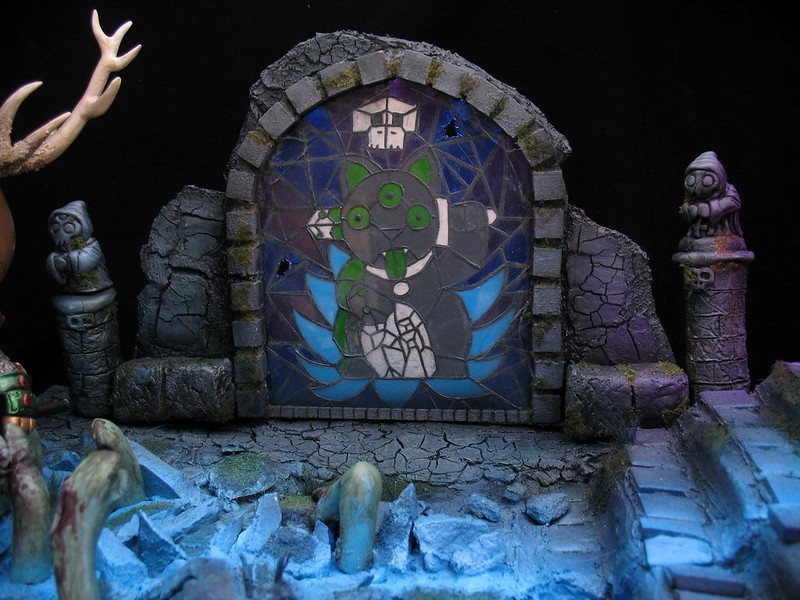


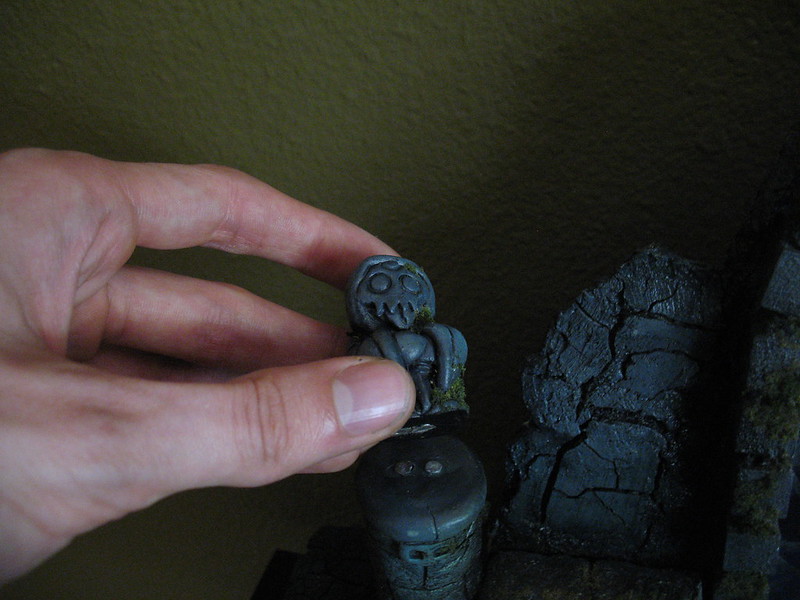
The gohst statue on the left was sculpted with magnetic contacts on the bottom, so when you set it properly on the pillar, it lights up the 8 LEDs mounted on the backside of the stained glass.
OFF:

ON:


fplus- CAD Recruit
- Posts : 99
Join date : 2011-09-23 -
Admin- FERG
- Posts : 3993
Join date : 2008-06-21 -
Re: DEATH IS INFINITE: Giant Squadt project finished!
![]() chelito19soccer Sat Aug 11, 2012 5:10 am
chelito19soccer Sat Aug 11, 2012 5:10 am

chelito19soccer- CAD Born Again Hard
- Posts : 385
Join date : 2011-06-27
Age : 36
Location : Tustin, CA
Page 5 of 8 • 1, 2, 3, 4, 5, 6, 7, 8 ![]()
» Custom Project: Nozzel [STLKR] FINISHED (29/12 final pics)
» Custom Project : Trouble Vamp (update 18/01: final pics)
» the squadt project
» death squadt wip
|
|
|