Painting a Squadt: Not Step by Step - A Work in Progress
Page 3 of 7 •  1, 2, 3, 4, 5, 6, 7
 ![]()
Re: Painting a Squadt: Not Step by Step - A Work in Progress
![]() geopina Thu Jan 02, 2014 5:55 am
geopina Thu Jan 02, 2014 5:55 am
what are you going to paint Charlie?

geopina- CAD Born Again Hard
- Posts : 306
Join date : 2011-06-27
Location : So. California
Re: Painting a Squadt: Not Step by Step - A Work in Progress
![]() alarment Thu Jan 02, 2014 6:42 pm
alarment Thu Jan 02, 2014 6:42 pm

alarment- CAD Recruit
- Posts : 52
Join date : 2012-07-24
Location : Albuquerque, NM -

Re: Painting a Squadt: Not Step by Step - A Work in Progress
![]() ontheDL Thu Jan 02, 2014 6:51 pm
ontheDL Thu Jan 02, 2014 6:51 pm

ontheDL- c0113c70r_D3$7r0y3r
- Posts : 4588
Join date : 2008-07-05
Age : 40
Location : Vegas
Re: Painting a Squadt: Not Step by Step - A Work in Progress
![]() CankleBreaker Thu Jan 02, 2014 7:04 pm
CankleBreaker Thu Jan 02, 2014 7:04 pm
geopina wrote:Always wash your hands and the object you are painting, if you can strip the old paint off. and use a good primer, i use the automotive ones not the plastic. the plastic for me ended up sticky/tacky.
what are you going to paint Charlie?
My TL Gohst
I'm unsure as to what route I'll be going but I puttied up his third eye as of now, need to sand and paint.
Are you referring to automotive primer? Can I buy this at the local auto shop?

CankleBreaker- CAD Animal Mother
- Posts : 2185
Join date : 2012-07-10
Age : 39
Location : L.A.
Re: Painting a Squadt: Not Step by Step - A Work in Progress
![]() itsa_mia Fri Jan 03, 2014 12:06 am
itsa_mia Fri Jan 03, 2014 12:06 am
rustoleum primer grey - worked well on helm/body but remained tacky on arms
rustoleum ulta cover 'plastic' - went well on body with rustoleum primer
ive read that krylon doesnt play well with any other brands besides krylon
maybe true, maybe not but the krylon ultra flat camouflage did crackle instantly when i sprayed it over the rustoleum primer
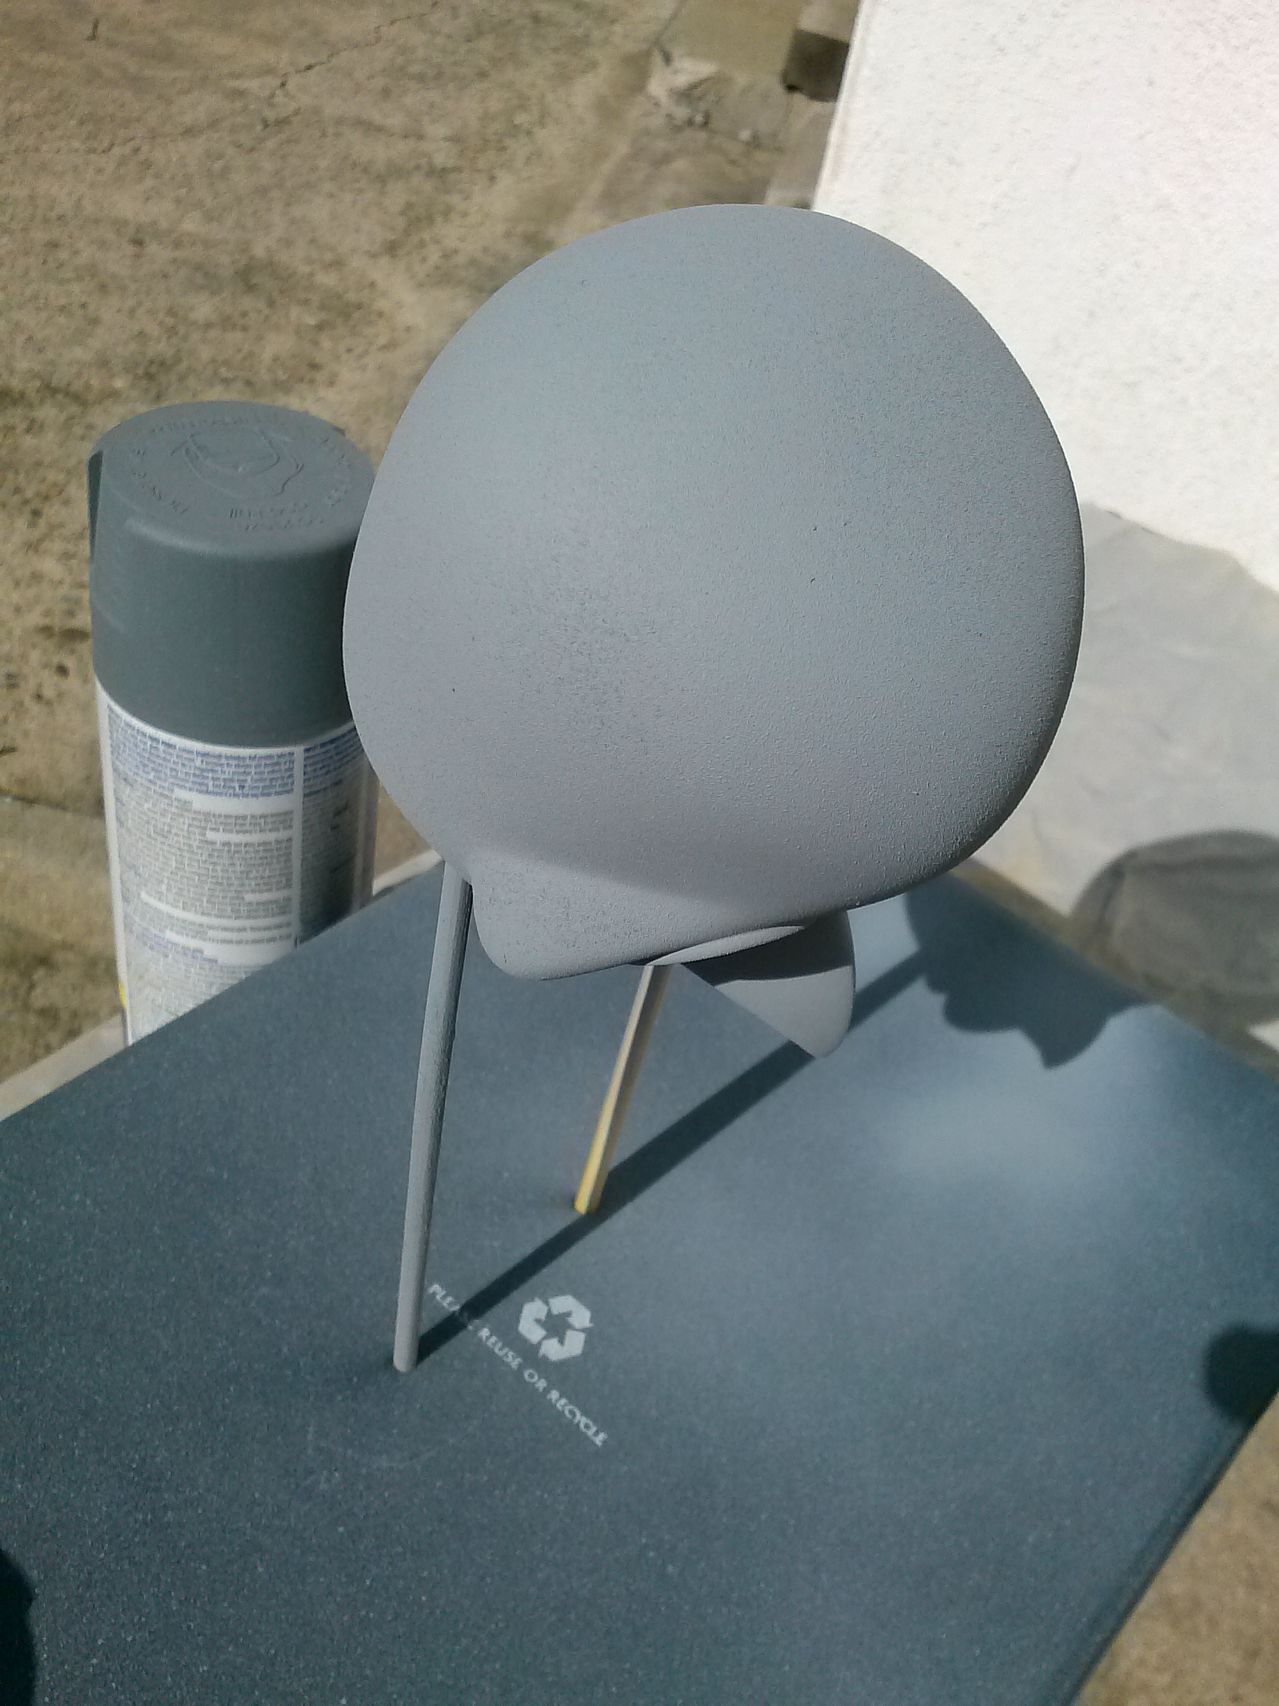
i stripped the helm and sprayed the krylon w/o primer the 2nd time, seems fine (pic)
ive yet to try the arms again, its too cold to paint until spring
and when that time comes ill try mr hobby, tamiya or montana 94 sprays
wash your hands, wash the parts well with dish soap!


itsa_mia- c0113c70r_D3$7r0y3r
- Posts : 5336
Join date : 2011-10-26
Age : 55
Location : N49 -
Re: Painting a Squadt: Not Step by Step - A Work in Progress
![]() dan-knee rock Fri Jan 03, 2014 12:40 am
dan-knee rock Fri Jan 03, 2014 12:40 am
itsa_mia wrote:
This pic makes me want to paint my TB matte black.

dan-knee rock- CAD Grunt
- Posts : 244
Join date : 2010-06-28 -
Re: Painting a Squadt: Not Step by Step - A Work in Progress
![]() ROACHSHACK138 Mon Feb 03, 2014 11:36 pm
ROACHSHACK138 Mon Feb 03, 2014 11:36 pm
Ive seen wires used before to paint arms and stands for helmets. Color me stupid but I dont know where to look to find anything like that.

ROACHSHACK138- CAD Animal Mother
- Posts : 1690
Join date : 2012-06-19
Age : 32
Location : CA
Re: Painting a Squadt: Not Step by Step - A Work in Progress
![]() Guest Tue Feb 04, 2014 9:10 pm
Guest Tue Feb 04, 2014 9:10 pm
ROACHSHACK138 wrote:Quick question: What do you guys use to paint on?
Ive seen wires used before to paint arms and stands for helmets. Color me stupid but I dont know where to look to find anything like that.
Bamboo skewers. I am not at home so I will try to describe what I use and post a picture later. A big block of foam works great to hold the skewers while paint dries.
Straight skewer for helmets, heads, and bodies.
Skewer wrapped on the end with masking tape. Make the tape thick enough so it is a nice fit inside the legs.
Skewer wrapped on the end with masking tape and holding a couple straight pins. The arm material is soft enough to push the flat end of the arm, at the shoulder, onto the pins. Just never hold the skewer upside down....the arm can fall off by it's own weight. To make this start wrapping some tape. After you get about half what is needed to fit in the leg then lay in two straight pins as you continue to wrap the tape. Make sure the pins are not too close together.
Hope this helps a little.....will follow up with pics....
Just the way I do it.

Guest- Guest
Re: Painting a Squadt: Not Step by Step - A Work in Progress
![]() CankleBreaker Thu Feb 06, 2014 7:23 pm
CankleBreaker Thu Feb 06, 2014 7:23 pm
Question, what do you all think is the best way to replicate the smoky eye look on the FB figures and SA Germ?
CankleBreaker- CAD Animal Mother
- Posts : 2185
Join date : 2012-07-10
Age : 39
Location : L.A.
Re: Painting a Squadt: Not Step by Step - A Work in Progress
![]() ROACHSHACK138 Sat Feb 08, 2014 10:00 pm
ROACHSHACK138 Sat Feb 08, 2014 10:00 pm


ROACHSHACK138- CAD Animal Mother
- Posts : 1690
Join date : 2012-06-19
Age : 32
Location : CA
Re: Painting a Squadt: Not Step by Step - A Work in Progress
![]() itsa_mia Sat Feb 08, 2014 11:17 pm
itsa_mia Sat Feb 08, 2014 11:17 pm
i think it looks great

itsa_mia- c0113c70r_D3$7r0y3r
- Posts : 5336
Join date : 2011-10-26
Age : 55
Location : N49 -
Re: Painting a Squadt: Not Step by Step - A Work in Progress
![]() CankleBreaker Sat Feb 08, 2014 11:40 pm
CankleBreaker Sat Feb 08, 2014 11:40 pm
CankleBreaker- CAD Animal Mother
- Posts : 2185
Join date : 2012-07-10
Age : 39
Location : L.A.
Re: Painting a Squadt: Not Step by Step - A Work in Progress
![]() ROACHSHACK138 Sun Feb 09, 2014 1:31 am
ROACHSHACK138 Sun Feb 09, 2014 1:31 am
 , but I think this looks much better now with the light gray
 Edit: Ive noticed the paint is a bit grainy. Anything I can do? Should I recoat or just leave it?

ROACHSHACK138- CAD Animal Mother
- Posts : 1690
Join date : 2012-06-19
Age : 32
Location : CA
Re: Painting a Squadt: Not Step by Step - A Work in Progress
![]() Guest Sun Feb 09, 2014 2:04 am
Guest Sun Feb 09, 2014 2:04 am
How far from the piece are you holding the can when you paint?
That will not get better with more paint. Either wet sand the entire thing until you are happy with the surface or strip it and try again.
Guest- Guest
Re: Painting a Squadt: Not Step by Step - A Work in Progress
![]() ROACHSHACK138 Sun Feb 09, 2014 2:25 am
ROACHSHACK138 Sun Feb 09, 2014 2:25 am
ROACHSHACK138- CAD Animal Mother
- Posts : 1690
Join date : 2012-06-19
Age : 32
Location : CA
Re: Painting a Squadt: Not Step by Step - A Work in Progress
![]() Guest Sun Feb 09, 2014 3:06 am
Guest Sun Feb 09, 2014 3:06 am
Haven't used the auto primer. Let us know how it works out.
Guest- Guest
Re: Painting a Squadt: Not Step by Step - A Work in Progress
![]() ROACHSHACK138 Sun Feb 09, 2014 3:36 am
ROACHSHACK138 Sun Feb 09, 2014 3:36 am

ROACHSHACK138- CAD Animal Mother
- Posts : 1690
Join date : 2012-06-19
Age : 32
Location : CA
Re: Painting a Squadt: Not Step by Step - A Work in Progress
![]() itsa_mia Sun Feb 09, 2014 9:24 am
itsa_mia Sun Feb 09, 2014 9:24 am
its probably from spraying too far away
also shake the heck outta the can, a few minutes for sure
i had to strip and redo mine like 3 times
oh and also http://www.picresize.com/ u dick haha
itsa_mia- c0113c70r_D3$7r0y3r
- Posts : 5336
Join date : 2011-10-26
Age : 55
Location : N49 -
Re: Painting a Squadt: Not Step by Step - A Work in Progress
![]() patrick40 Sun Feb 09, 2014 3:11 pm
patrick40 Sun Feb 09, 2014 3:11 pm

patrick40- COLLECTOR-DESTOYER
- Posts : 3151
Join date : 2013-04-19
Location : netherlands
Re: Painting a Squadt: Not Step by Step - A Work in Progress
![]() edstuff Sun Feb 09, 2014 8:28 pm
edstuff Sun Feb 09, 2014 8:28 pm
CankleBreaker wrote:Can't wait for pics Greg.
Question, what do you all think is the best way to replicate the smoky eye look on the FB figures and SA Germ?
airbrush
ROACHSHACK138 wrote:I'm doing light grey for my doc and this grey primer came out darker than expected. If I go with a lighter grey, would I have to strip down and start over since the primer is darker than intended color? And 2nd opinion: SHOULD I go lighter grey or does it look good as is?
I think you can just spray the lighter grey right over the primer. Shouldn't bleed through.

edstuff- CAD Too Buku
- Posts : 1212
Join date : 2010-11-22
Age : 46
Location : Chicago
Re: Painting a Squadt: Not Step by Step - A Work in Progress
![]() ROACHSHACK138 Sun Feb 09, 2014 10:39 pm
ROACHSHACK138 Sun Feb 09, 2014 10:39 pm
ROACHSHACK138- CAD Animal Mother
- Posts : 1690
Join date : 2012-06-19
Age : 32
Location : CA
Re: Painting a Squadt: Not Step by Step - A Work in Progress
![]() edstuff Sun Feb 09, 2014 10:46 pm
edstuff Sun Feb 09, 2014 10:46 pm
edstuff- CAD Too Buku
- Posts : 1212
Join date : 2010-11-22
Age : 46
Location : Chicago
Re: Painting a Squadt: Not Step by Step - A Work in Progress
![]() ROACHSHACK138 Sun Feb 09, 2014 10:59 pm
ROACHSHACK138 Sun Feb 09, 2014 10:59 pm
edstuff wrote:Ha my copperhead was floating in the flood. He's got water in his helmet and I have no idea how to get it out. May have to puncture it and then soak in bleach.
Have you had any issues with the water being in there or is it fine?
ROACHSHACK138- CAD Animal Mother
- Posts : 1690
Join date : 2012-06-19
Age : 32
Location : CA
Re: Painting a Squadt: Not Step by Step - A Work in Progress
![]() edstuff Mon Feb 10, 2014 12:14 am
edstuff Mon Feb 10, 2014 12:14 am
edstuff- CAD Too Buku
- Posts : 1212
Join date : 2010-11-22
Age : 46
Location : Chicago
Re: Painting a Squadt: Not Step by Step - A Work in Progress
![]() CankleBreaker Mon Feb 10, 2014 1:32 am
CankleBreaker Mon Feb 10, 2014 1:32 am
ROACHSHACK138 wrote:Anyone get water in their squadt helmets? After washing it with some soap and water, I got a little inside the helmet. I tried squeezing out as much as I could but still got some in there. Anyone else had this problem?
Lol, I was worried about this issue when I washed mine so I put a small piece of tape over it. Maybe try putting the helmet in some rice, but be careful not to let the rice get in also... don't want a rattle or mold growing w/ the water and rice combo! Then again, I didn't even wash the inside of my helmet, wanted to leave it stock...
CankleBreaker- CAD Animal Mother
- Posts : 2185
Join date : 2012-07-10
Age : 39
Location : L.A.
Page 3 of 7 • 1, 2, 3, 4, 5, 6, 7 ![]()
» A Work in Progress
» Forest Guardian Squadt, complete with a few progress pics!
» Beat Up Boxer (Resin Figure).
» One of a kind Painting!!!
|
|
|