cripery's 'customizing'
+32
Viroid1
n8iv22
Vulpini
niskio
funkin
Colossus of Destiny
Illusive
Admin
0khrana
chase1319
itsa_mia
Arttoylife
geekvinyl
gasTHUMB
jorester
Kidglasgow
Shauni55
JasperF
ilovefreestufftoo
dedicatedart
Silver
Gatiio
patrick40
mazdevilz
slinky42
Rambo84
Crunch
Teimaru
Takemaru
CankleBreaker
ROACHSHACK138
cripery
36 posters
Page 1 of 4
Page 1 of 4 • 1, 2, 3, 4 ![]()

cripery's 'customizing'
![]() cripery Tue Jul 01, 2014 2:55 pm
cripery Tue Jul 01, 2014 2:55 pm
So, I dabble a little at customizing and thought it'd be nice to have a topic of a few pieces I've worked on.. Really just kitbashes to be honest.
Anyway, I posted on IG this guy a while ago when I was working on him. Cr[ooze] missile:


- modded silenced smp5
- modded [cr]ooze missile RPG
- custom meat knife
- custom lenses
Anyway, I posted on IG this guy a while ago when I was working on him. Cr[ooze] missile:
- modded silenced smp5
- modded [cr]ooze missile RPG
- custom meat knife
- custom lenses
Last edited by cripery on Wed Jul 02, 2014 6:02 pm; edited 1 time in total

cripery- CAD Too Buku
- Posts : 1046
Join date : 2011-05-04
Age : 47
Location : UK
Re: cripery's 'customizing'
![]() cripery Tue Jul 01, 2014 3:01 pm
cripery Tue Jul 01, 2014 3:01 pm
I only posted on the photo thread the other day but just to keep them together, 'Slightly Camp Burnout':

- dyed pink FB t-shirt
- pink custom meat knife
- custom lenses
- painted RPG
- custom purple beanie by Gregm
- dyed pink FB t-shirt
- pink custom meat knife
- custom lenses
- painted RPG
- custom purple beanie by Gregm
cripery- CAD Too Buku
- Posts : 1046
Join date : 2011-05-04
Age : 47
Location : UK
Re: cripery's 'customizing'
![]() ROACHSHACK138 Tue Jul 01, 2014 3:11 pm
ROACHSHACK138 Tue Jul 01, 2014 3:11 pm
I love the ooze on that launcher 
These are some dope customs, man.
These are some dope customs, man.

ROACHSHACK138- CAD Animal Mother
- Posts : 1690
Join date : 2012-06-19
Age : 32
Location : CA
Re: cripery's 'customizing'
![]() CankleBreaker Tue Jul 01, 2014 7:12 pm
CankleBreaker Tue Jul 01, 2014 7:12 pm
Diggin the custom RPG and silenced gun! Simple yet effective. My kinda style. 

CankleBreaker- CAD Animal Mother
- Posts : 2185
Join date : 2012-07-10
Age : 39
Location : L.A.

Takemaru- CAD Too Buku
- Posts : 1153
Join date : 2012-11-04
Re: cripery's 'customizing'
![]() Teimaru Tue Jul 01, 2014 10:44 pm
Teimaru Tue Jul 01, 2014 10:44 pm
I second this. Great idea on the rocket laucher ! keep on the good work mate 

Teimaru- CAD Animal Mother
- Posts : 1916
Join date : 2012-11-27

Crunch- CAD Too Buku
- Posts : 1009
Join date : 2011-12-27
Age : 38
Location : Phoenix

Rambo84- CAD Recruit
- Posts : 87
Join date : 2014-05-28
slinky42- CAD Born Again Hard
- Posts : 469
Join date : 2011-02-14
Re: cripery's 'customizing'
![]() cripery Wed Jul 02, 2014 6:02 pm
cripery Wed Jul 02, 2014 6:02 pm
Thanks guys! 
Got a few other bits and bobs I'm currently working on - I'll post them when/if they work out..
Got a few other bits and bobs I'm currently working on - I'll post them when/if they work out..
cripery- CAD Too Buku
- Posts : 1046
Join date : 2011-05-04
Age : 47
Location : UK
Re: cripery's 'customizing'
![]() mazdevilz Wed Jul 02, 2014 11:51 pm
mazdevilz Wed Jul 02, 2014 11:51 pm
Like a Boss!!! awesome stuff Ben!!! love that knife.


mazdevilz- CAD Animal Mother
- Posts : 2475
Join date : 2011-02-06
Age : 46
Location : Los Angeles

patrick40- COLLECTOR-DESTOYER
- Posts : 3151
Join date : 2013-04-19
Location : netherlands

Gatiio- COLLECTOR-DESTOYER
- Posts : 3261
Join date : 2011-10-12
Age : 37
Location : Chicago -


Silver- CAD Born Again Hard
- Posts : 315
Join date : 2011-01-20
Age : 42
Location : IT
Re: cripery's 'customizing'
![]() dedicatedart Sun Jul 06, 2014 8:28 pm
dedicatedart Sun Jul 06, 2014 8:28 pm
Awsome on both how'd you dothe oozze?

dedicatedart- CAD Animal Mother
- Posts : 1817
Join date : 2011-12-29
Location : Driving through your moms triangle.

ilovefreestufftoo- c0113c70r_D3$7r0y3r
- Posts : 4268
Join date : 2012-05-13
Location : So Calif

JasperF- CAD Too Buku
- Posts : 1002
Join date : 2012-05-16
Age : 38
Location : Utrecht, the Netherlands
Re: cripery's 'customizing'
![]() cripery Tue Jul 08, 2014 11:27 pm
cripery Tue Jul 08, 2014 11:27 pm
dedicatedart wrote:how'd you dothe oozze?
I probably made it unnecessarily complicated but I wanted to try a bit of mould making and resin casting, plus I didn't want to 'ruin' a real rpg.
So, I took the green rpg off of a spare SA launcher I had. Just heated it up and tugged and twisted it until it came free. The fins are separate to the main body of the rocket, so they needed gluing back together.
I then made a two part rubber mould of the original rocket. That allowed me to then cast a couple of blank copies of the original rocket that I could mess around with trying to get the ooze effect. After a couple of aborted efforts I eventually got something I was fairly happy with, I basically used Milliput rolled and laid and sculpted onto the rocket copy.
Then, I made another mould of my modified copy, as I wanted to be able to make multiple copies of the ooze rocket as I knew I'd probably have to experiment with painting it before getting something decent. So, I made a couple of resin casts of the ooze rocket and basically painted it. I found a suitably glossy black model paint that when dried looked fairly close to the glossy plastic of the retail ooze.
The only other thing I had to do was because my cast was a solid piece of resin I had to drill a large hole in the centre of the fins (about 8mm) so that the new rocket could actually be slid onto the original launcher.
The whole process was very time consuming but it was a good learning process too. It also made me really appreciate the amount of time/effort and huge amounts of skill & patience that professional customizers/designers must have to come up with some of the amazing creations we see on a regular basis.
cripery- CAD Too Buku
- Posts : 1046
Join date : 2011-05-04
Age : 47
Location : UK

Shauni55- Trench Warmer
- Posts : 38
Join date : 2014-06-19
That slightly camp is amazing
![]() Kidglasgow Thu Jul 31, 2014 10:23 pm
Kidglasgow Thu Jul 31, 2014 10:23 pm
Hey man I love that camp squadt looks dope keep,going ur Turing out great stuff IMO slightly camp looks so different to ur adveredge and IMO that's great

Kidglasgow- CAD Recruit
- Posts : 64
Join date : 2014-06-09
Age : 46
Location : Glasgow
Re: cripery's 'customizing'
![]() Guest Tue Aug 12, 2014 6:23 pm
Guest Tue Aug 12, 2014 6:23 pm
OK Ben...Where is the tutorial on that bad ass custom shirt??


Guest- Guest
Re: cripery's 'customizing'
![]() cripery Tue Aug 12, 2014 8:31 pm
cripery Tue Aug 12, 2014 8:31 pm
gregm wrote:OK Ben...Where is the tutorial on that bad ass custom shirt??
Hey Greg, thanks! - sure, I'll try and do a little write up - probably tomorrow now.
This one? :
https://jamungo.forumotion.com/t4675p510-trouble-boys-s00-nkd-gid#134702
cripery- CAD Too Buku
- Posts : 1046
Join date : 2011-05-04
Age : 47
Location : UK
Re: cripery's 'customizing'
![]() cripery Fri Aug 22, 2014 2:33 pm
cripery Fri Aug 22, 2014 2:33 pm
So, I've been making a couple of custom tees lately using iron-on, inkjet printable, transfer paper.
It seems that there are pretty much two types of paper you can get - the type intended for application to dark fabric and the type intended for use on light fabric. The difference being that the white paper stays white on the dark fabric type (therefore obscuring everything beneath the transfer), where as the white paper turns transparent on the light fabric type (thereby allowing the fabric colour to show through on any white areas of the transfer).
I ended up buying 4 different packs. 2 light & 2 dark. One of the light packs and one of the dark packs were more expensive than the other two packs and I think it is a case of you get what you pay for. Whilst the cheaper paper worked OK I found the finished transfer ended up looking very 'plasticy' and glossy and raised from the fabric itself. I also ended up accidentally melting a couple of these transfers. The more expensive type produced a much more matt looking end result, as if the transfer were more melted into the fabric.
I remember using this type of paper 20+ years ago when I was printing band t-shirts (ahh, the good old days ;-) ) and it definitely seems to have improved somewhat in the interim. The quality is much better and there is no need to mirror the image before printing like I remember having to do in the past.
So, I won't do a real detailed tutorial on actually using this stuff.. - There are plenty of guides and videos on the Interwebs and the paper I bought came with some decent enough instructions on use. Here's just a quick summary with some pics of my latest one:
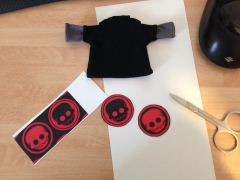
- You're going to want to use a reasonably hi-res source image, so that when you print it out it's nice and smooth looking with no jagged edges. Here's some logos on the PC, ready to be printed out:

- And here's a similar set of logos printed out on the dark-type transfer paper:

- It goes without saying that you're going to want to do some test-printing on plain paper before wasting your valuable transfer paper. You need to make sure you leave enough room between images to cut them out, unlike what I've accidentally done in the picture ;-).
- Then you need to employee your very best cutting out skills... though depending on what paper you're using and what colour tee you're printing on, it sometimes doesn't matter how neat your edges are. If I do many more circular ones I might invest in a little circle cutting tool of some description. :
- Then you just remove the backing paper from the transfer and apply it to a tee. I always test a couple of these on an old human sized tee of a similar colour before trying it on a valuable Squadt sized tee!:

- You then cover the image with silicon paper before applying a hot iron to it:

- I used a standard household clothes iron, set to the highest temperature it would go, with no water in it, so there would be no steam. I pressed fairly hard for about 20 seconds or so. Though I'm sure this will vary between types of transfer paper. Here's a few test transfers ironed onto a human size tester tee:

Here's the redjack logo ready to be ironed onto a Squadt tee. In this case it's the back of the Fort Burnout shirt from PAC 6. I thought this would look particularly fetching on Redjack, as the arms of the tee will match his grey beanie hat ;-) :

And here's the finished article with the transfer ironed on:
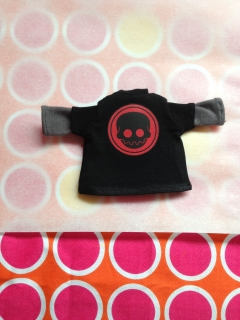
Finally, here's Redjack enjoying his new garment:


Please don't quote this big-ass post BTW!
It seems that there are pretty much two types of paper you can get - the type intended for application to dark fabric and the type intended for use on light fabric. The difference being that the white paper stays white on the dark fabric type (therefore obscuring everything beneath the transfer), where as the white paper turns transparent on the light fabric type (thereby allowing the fabric colour to show through on any white areas of the transfer).
I ended up buying 4 different packs. 2 light & 2 dark. One of the light packs and one of the dark packs were more expensive than the other two packs and I think it is a case of you get what you pay for. Whilst the cheaper paper worked OK I found the finished transfer ended up looking very 'plasticy' and glossy and raised from the fabric itself. I also ended up accidentally melting a couple of these transfers. The more expensive type produced a much more matt looking end result, as if the transfer were more melted into the fabric.
I remember using this type of paper 20+ years ago when I was printing band t-shirts (ahh, the good old days ;-) ) and it definitely seems to have improved somewhat in the interim. The quality is much better and there is no need to mirror the image before printing like I remember having to do in the past.
So, I won't do a real detailed tutorial on actually using this stuff.. - There are plenty of guides and videos on the Interwebs and the paper I bought came with some decent enough instructions on use. Here's just a quick summary with some pics of my latest one:
- You're going to want to use a reasonably hi-res source image, so that when you print it out it's nice and smooth looking with no jagged edges. Here's some logos on the PC, ready to be printed out:
- And here's a similar set of logos printed out on the dark-type transfer paper:
- It goes without saying that you're going to want to do some test-printing on plain paper before wasting your valuable transfer paper. You need to make sure you leave enough room between images to cut them out, unlike what I've accidentally done in the picture ;-).
- Then you need to employee your very best cutting out skills... though depending on what paper you're using and what colour tee you're printing on, it sometimes doesn't matter how neat your edges are. If I do many more circular ones I might invest in a little circle cutting tool of some description. :
- Then you just remove the backing paper from the transfer and apply it to a tee. I always test a couple of these on an old human sized tee of a similar colour before trying it on a valuable Squadt sized tee!:
- You then cover the image with silicon paper before applying a hot iron to it:
- I used a standard household clothes iron, set to the highest temperature it would go, with no water in it, so there would be no steam. I pressed fairly hard for about 20 seconds or so. Though I'm sure this will vary between types of transfer paper. Here's a few test transfers ironed onto a human size tester tee:
Here's the redjack logo ready to be ironed onto a Squadt tee. In this case it's the back of the Fort Burnout shirt from PAC 6. I thought this would look particularly fetching on Redjack, as the arms of the tee will match his grey beanie hat ;-) :
And here's the finished article with the transfer ironed on:
Finally, here's Redjack enjoying his new garment:
Please don't quote this big-ass post BTW!
cripery- CAD Too Buku
- Posts : 1046
Join date : 2011-05-04
Age : 47
Location : UK
Takemaru- CAD Too Buku
- Posts : 1153
Join date : 2012-11-04

jorester- Quickly the Exits!
- Posts : 4138
Join date : 2008-11-06
Age : 51
Location : france
Page 1 of 4 • 1, 2, 3, 4 ![]()
» customizing a bud question
» Steps to customizing/painting a BUD?
» Customizing Techniques, Tips, & Tricks
» Steps to customizing/painting a BUD?
» Customizing Techniques, Tips, & Tricks
Page 1 of 4
Permissions in this forum:
You cannot reply to topics in this forum|
|
|